![]()
 Home
Home Products
 Cameras
Launch Monitors
Cameras
Launch Monitors Software
 Enclosures
 ProTee
 E6 Courses
 Business
 Tech News
 View Cart
Camera Alignment Instructions
Note that all below instructions assume that you are using CP version V 10.1.6.0 or higher
Please note:
As of August 2024, all SCX systems are shipped
with laser precision pre-calibrated fixed camera alignments.
As such, the below instructions are only for those that have previous versions
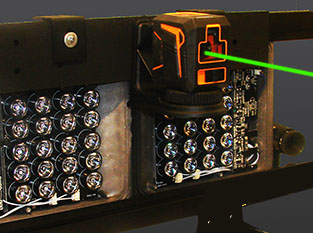
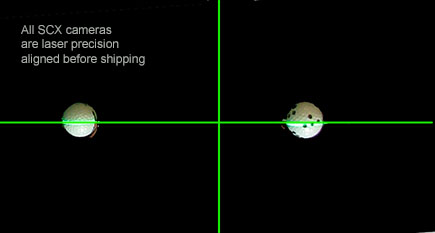
All SCX cameras are factory laser precison aligned before shipping now.
Plus, all new cased SCX systems now come with a mount laser alignment tool.
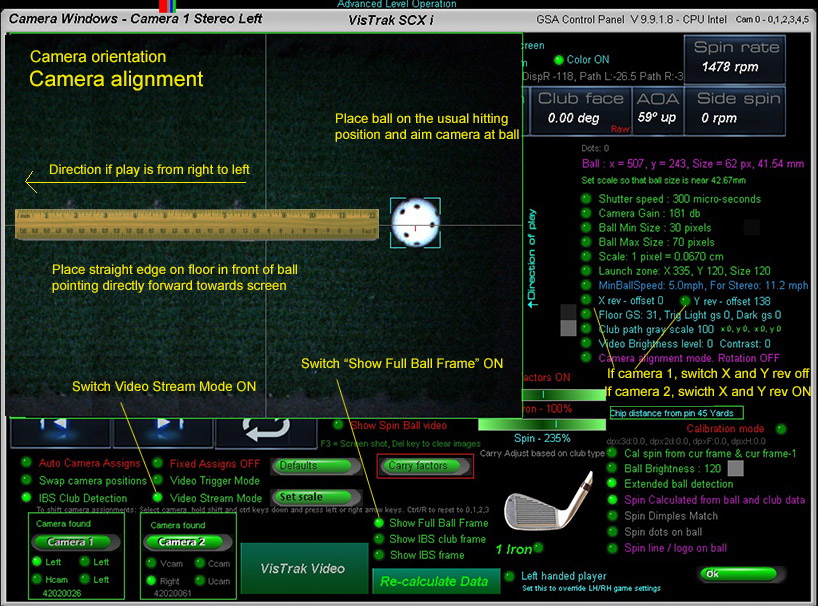
Camera Aiming
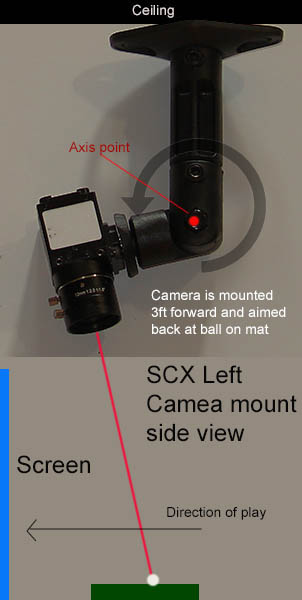
Aim the cameras back/forwards and inwards to point directly at the ball on the usual hitting posotion on the mat.
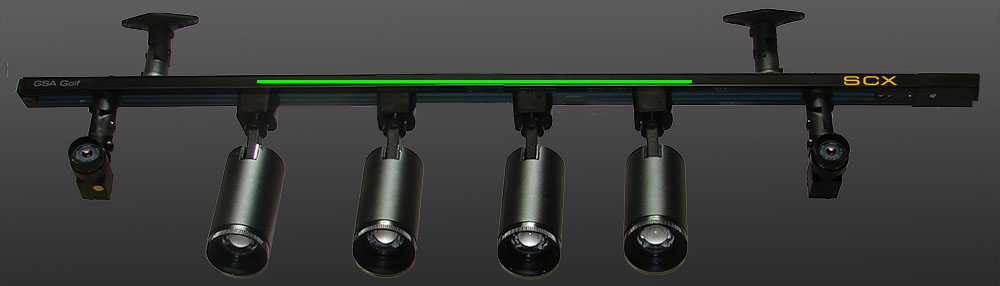
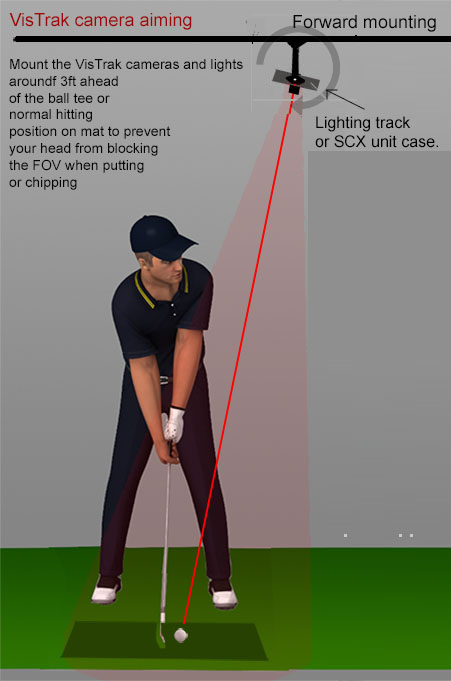
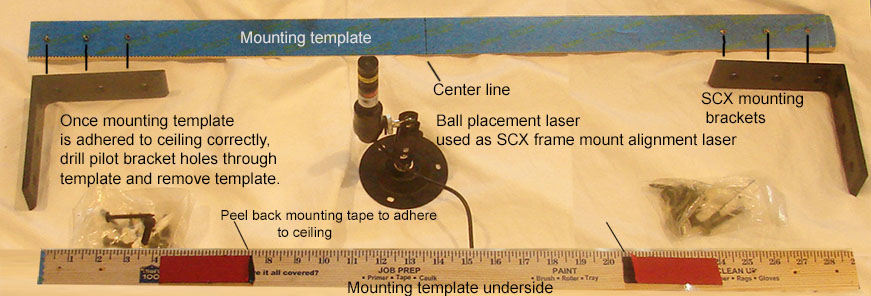
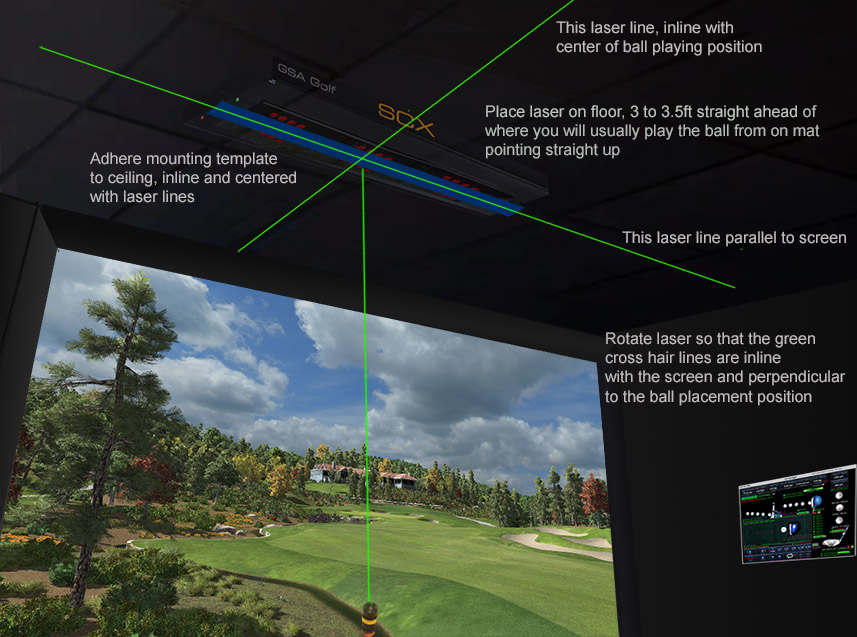
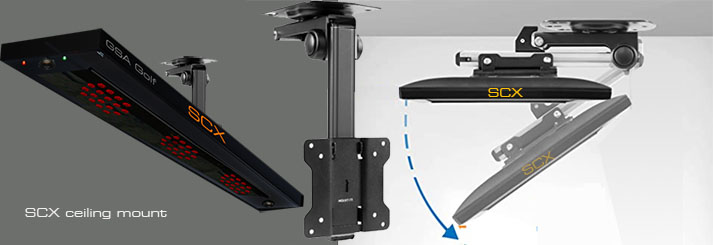
If using the track light system, attach the track to the ceiling around 3ft ahead of the usual hitting position with the supplied mounting hardware
Aim all track head lights and cameras so that they all point down at the hitting position on the mat


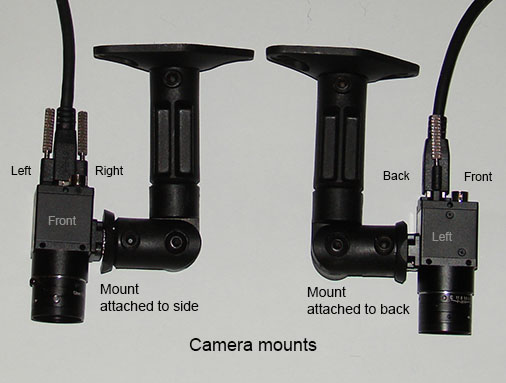
Ensure that the cameras are mounted or rotated such that the silver label on the camera is pointing outwards on both cameras

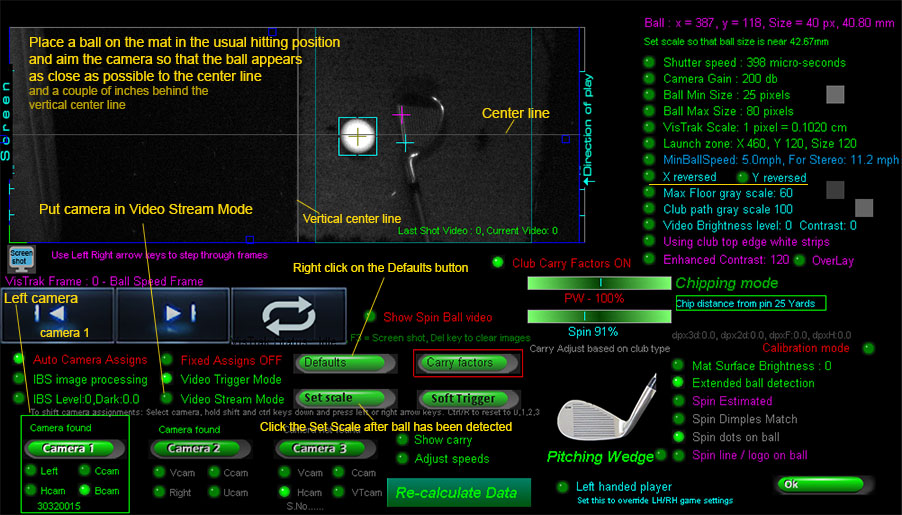
Aim cameras so that the ball on the mat appears relatively centered when the option "Show Full Ball Frame" is switched ON.
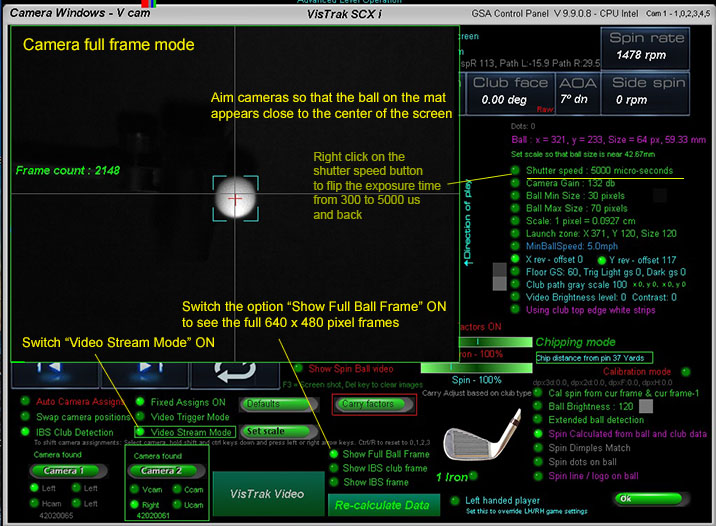
When aiming cameras, switch the options "Show Full Ball Frame" and "Video Stream mode" ON
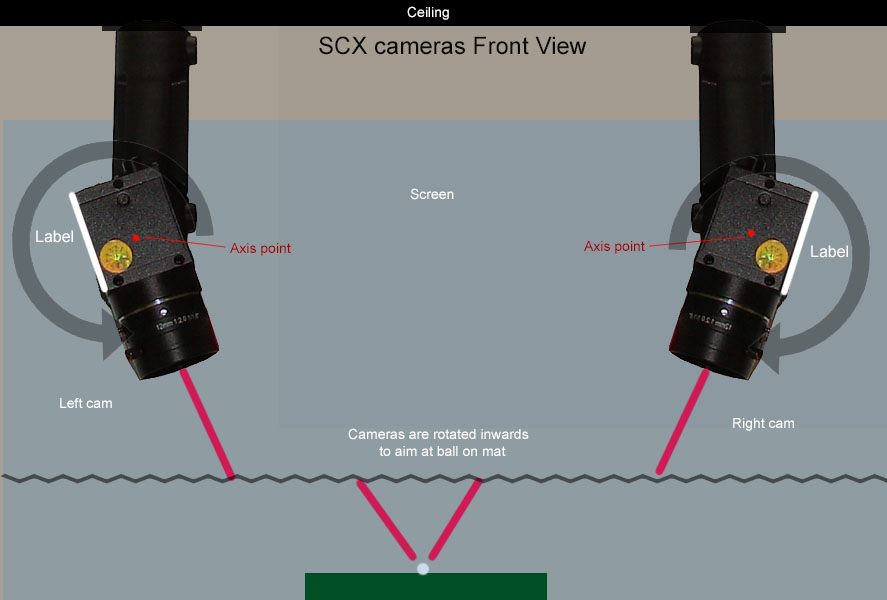

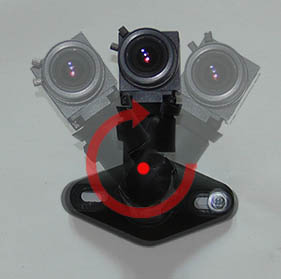
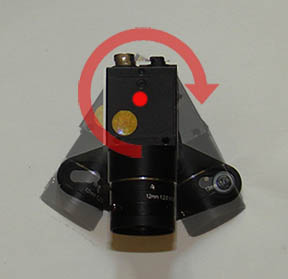
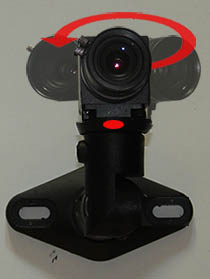
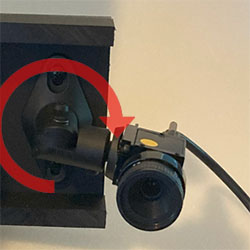
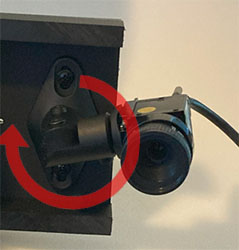
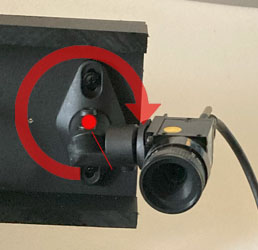
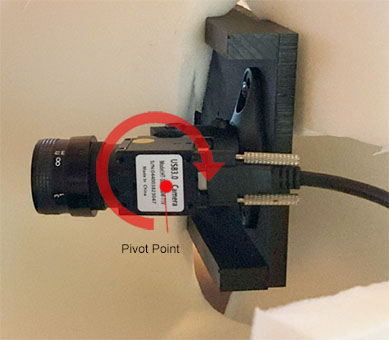
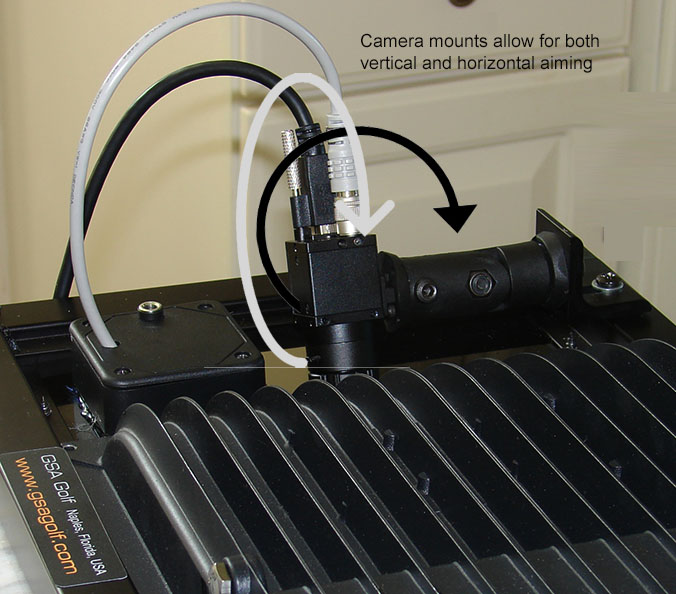
Cameras can be rotated on both the x and y axis.
Vertical tilt is done by rotating the casing or track back and forth.
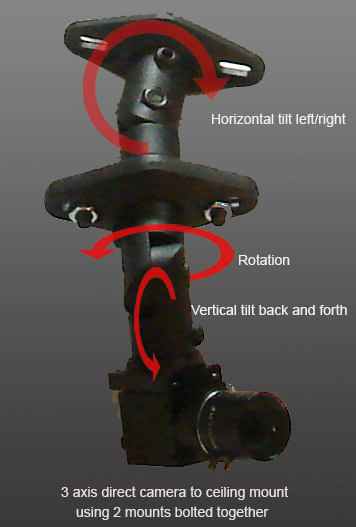
If mounting the cameras directly to the ceiling without a casing or track, then you will have to join two halves of a mount together
in order to get the 3rd axis
Mounting the cased or track mounted Cameras
![]()
Please note that if camera alignment if not set correctly
then all ball data
i.e. ball speed, ball vertical and horizontal angles
and thus resulting carry distance
will not be accurate !
![]()
What is camera alignment?
Camera alignment simply means that both cameras are tracking the ball inline
i.e. in a perfectly straight shot, both cameras should detect all ball images directly inline and straight forward
without any deviation left or right.
Why stereo camera alignment is important
If the camera alignment is off, then both ball vertical and horizontal angles won't be accurate plus measured ball speed will be off.
It's imperative that the 2 stereo cameras are aligned correctly in order for the system
to accurately measure ball speed, vertical and horizontal launch angles.
If the cameras are not properly aligned, then the system won't produce accurate shot data results.
To check your camera alignment, proceed as shown below
Cameras can be rotated on both the x and y axis.
Vertical tilt is done by rotating the casing or track back and forth.
If mounting the cameras directly to the ceiling without a casing, then you will have to join two halves of a mount together
in order to get the 3rd axis
![]()
Camera alignment instructions
Note : this procedure has to be done for both cameras
Start with camera 1 and then repeat for camera 2
Important :
When running the cameras in stream mode, do not have GSpro or TGC or E6 selected.
Select GSA API.
Otherwise the system will constantly try to connect to these game softwares
and will result in the cameras being reset to trigger mode
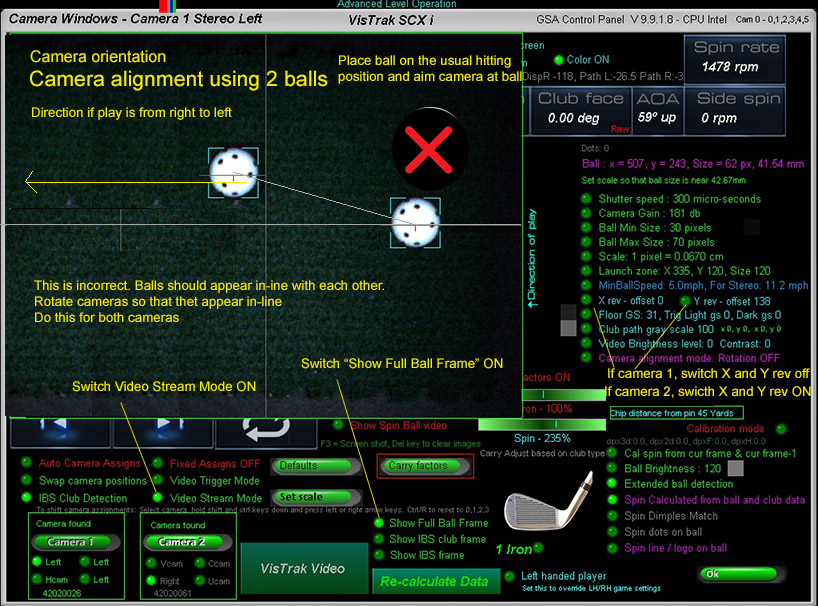
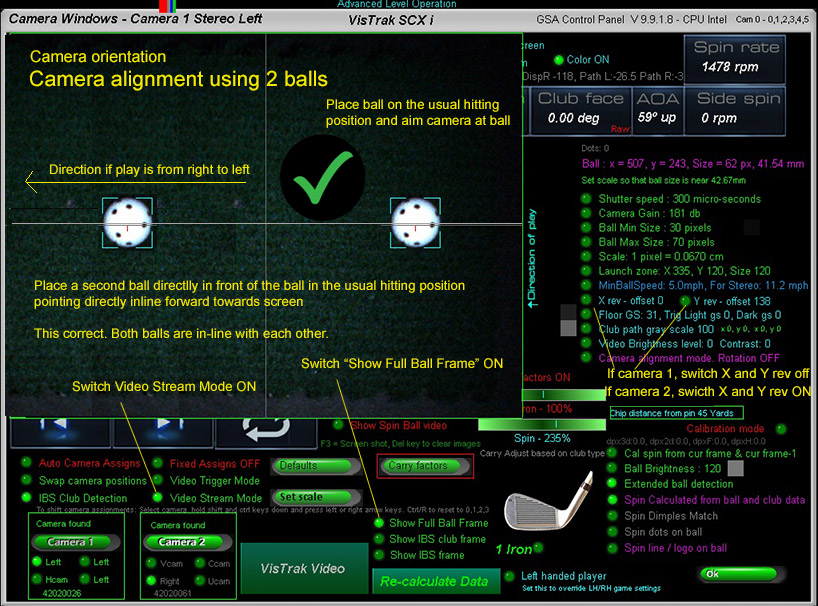
Rotate camera until both balls are in-line with each other close to the center line
Note that alignment is only for the overhead mounted cameras.
i.e. camera 1 in Eagle and EVi systems, and cameras 1 and 2 in the SCX system
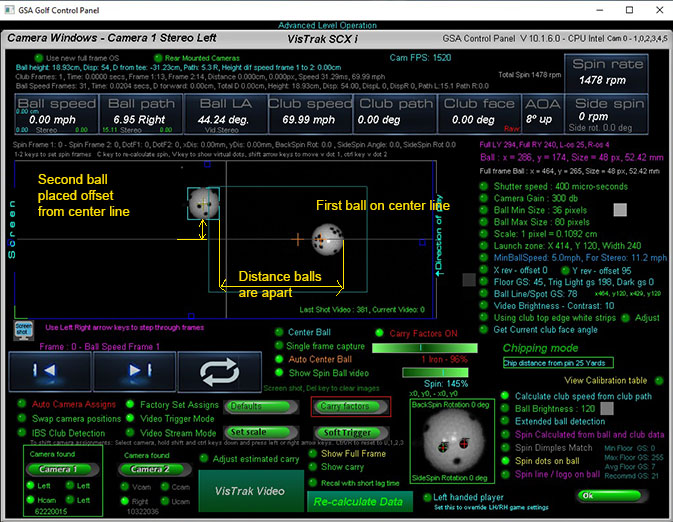
Camera alignment Checking
To check and adjust camera alignment
place a ball on the usual hitting position on the mat.
Then place another ball directly behind and another ball directly in front of the center ball
spaced at around 6 to 8 inches apart.
Rotate the camera on its base to adjust camera algnment
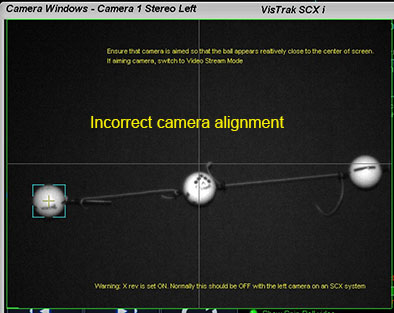
All 3 balls should appear on the same horizontal line
![]()
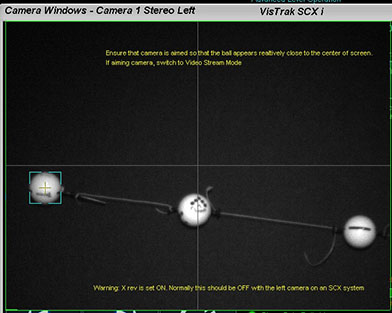
Vertical ball centering

Rotate the camera inwards and outwards to position the ball images onto the center line
![]()
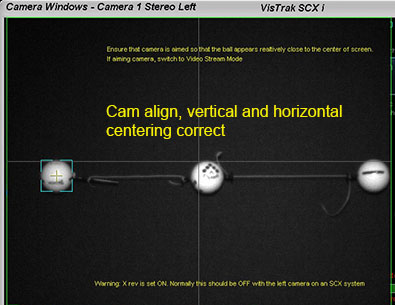
Horizontal ball centering

Rotate the camera up / down to position the ball images so that they all appear in the FOV of the camera
![]()
SCX ball path (Left and Right)
horizontal angle calibration
The calibration procedure entails placing 2 balls on the mat so that the ball ahead is set left or right of the first ball
thus giving a known ball horizontal angle (HA) from the stereo cameras.
The user then clicks on the "Get SCX ball path from single frame" button and compares the CP calculated HA with the known HA.
The slider bar is then used to match the results.
Step 1
Place ball on the mat in the usual place and click the Start/Stop VisTrak button.
This will capture the ball in both cameras and center them
Step 2
Go to camera 1 and place a second ball a known distance ahead of the first ball
and click the "Soft Trigger" button to capture a new image of both balls
Step 3
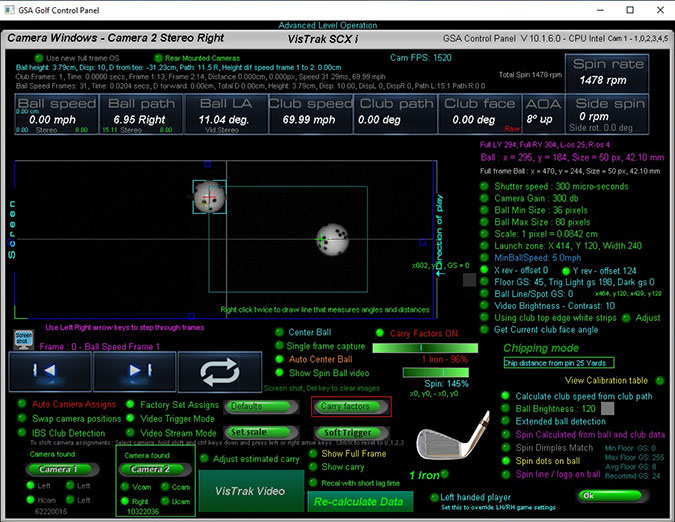
Go to camera 2 and click the "Soft Trigger" button adain to capture a new image of both balls in camera 2
Step 4
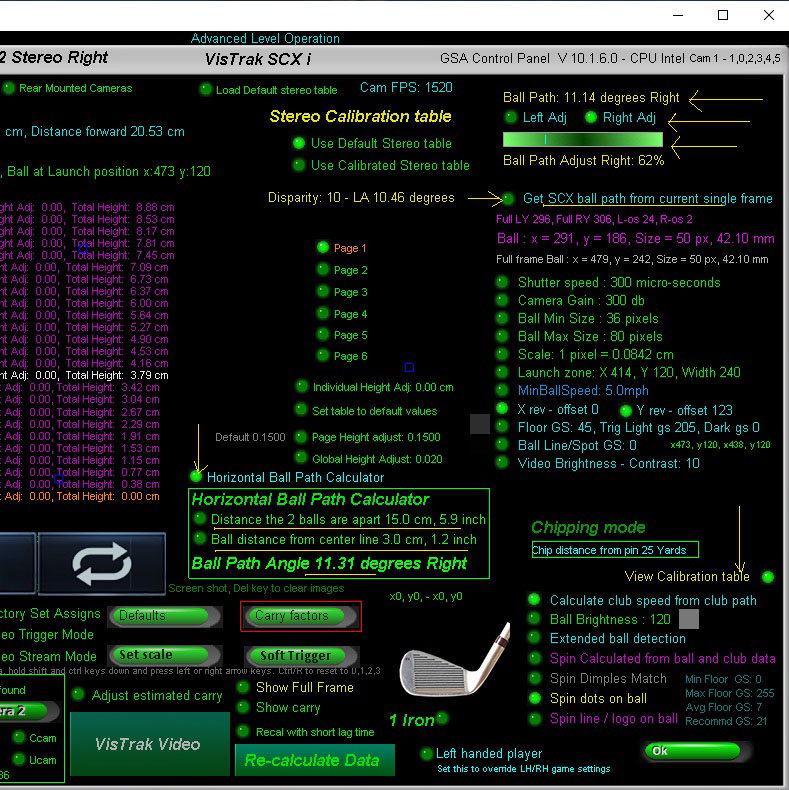
Click on the 'View Calibration Table" and select the "Horizontal Ball Path Calculator" button.
Step 5
Using the keyboards up and down arrow keys, set the "Distance the 2 balls are apart"
and the "Ball distance from center line" values
The correct ball path angle will be shown
Step 6
Use the "Ball path adjust" slider bar to match (as near as possible) the measured ball path from the cameras to the calculated ball path.
If the path is left, then select the "Left Adj" option
If the path is right, then select the "Right Adj" option
Step 7
Repeat the procedure for both left and right ball paths.
by placing the second ball on the right or left side of the original ball location.
i.e. do one time for left and one time for right second ball placements
Note
if you find the above ball path calibration procedure to be too tedious,
you can simply just use the ball path adjustment slider bar
to adjust the measured ball path to match what you are expecting the ball path to be for shots.
Why calibration maybe required
in contrast to a single centered overhead camera that only results in a single precise horizontal angle,
stereo cameras produce two opposing angles due to the toe in camera aiming.
e.g. with a perfect straight shot, the left camera will show a positive angle and the right a negative angle
but both measured angles (e.g. + and - 5 degrees) will cancel each other out to give a zero HA.
There are two separate adjustments for left and right path angles.
This was done because it is unknown how the user has aimed the stereo cameras and whether or not they are in alignment
i.e. it will probably be different for every user.
![]()
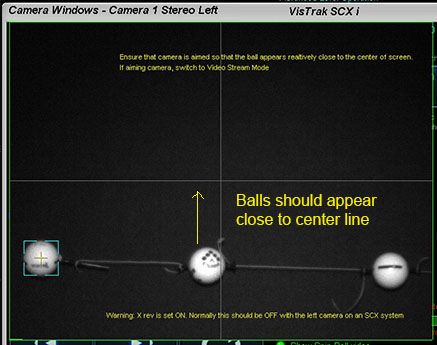
Aiming the cameras
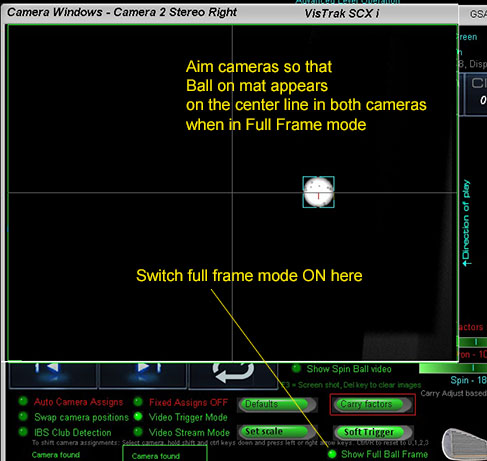
The stereo SCX cameras should be aimed so that the ball appears as close as possible to the center line when in Full Frame mode.
Switch to "Video Stream Mode" to do this in both cameras 1 and 2
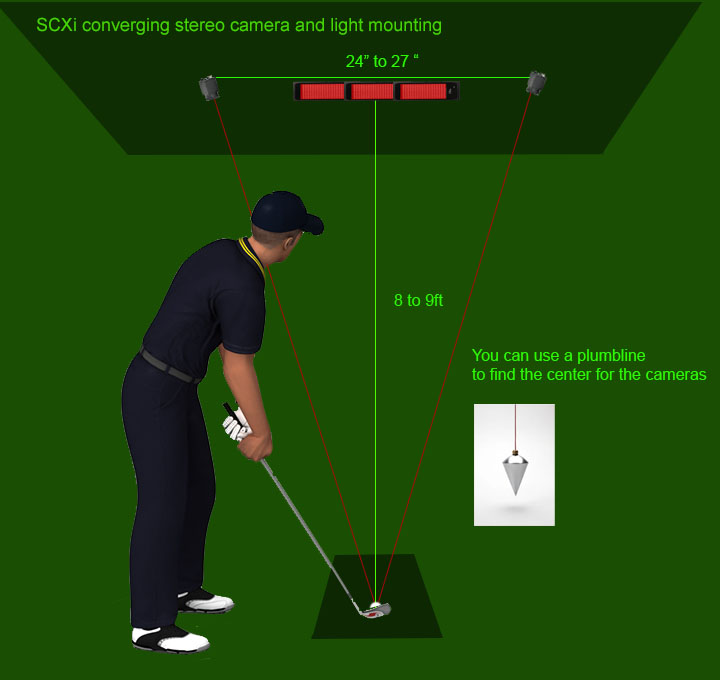
If using the SCX Track version, aim all lights and cameras so that they all point to the hitting position on the mat.
Depending on which side of the camera the mount is attached,
cameras may have to be rotated in order to obtain the correct orientation
If using the SCX Panel swing mount version, tilt the panel down on its mount so that it points back to the hitting position on the mat.
![]()
SCX camera orientation
The direction of play in both left and right cameras is always from right to left in the image frames
To Check:
place and ball on the mat and lay a club down behind it.
After clicking the "Soft Trigger" button. your image in the left camera should look like the above image.
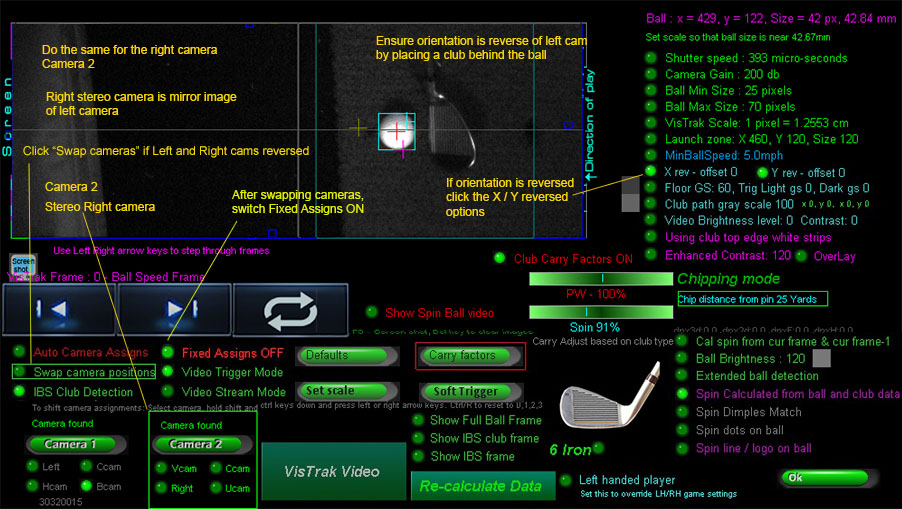
Do the same for the right camera.
Assuming the right camera has been mounted with the white/silver label facing outwards,
the X rev and Y rev right options should be set ON
SCX Left/Right camera confirmation
To confirm that the left camera is indeed the left camera and the right camera is indeed the right camera,
select camera 1 ( the left camera), switch to "Video Stream Mode", and wave a club in front of the camera's lens.
If you don't see that the frame images are being blocked, then the cameras have to be swapped around in the Control Panel.
To do this, simply click the " Swap camera positions" option and then the "Fixed Assigns" option ON so that the camera positions are stored.
SCX Dynamic ROI (Region of Interest)
The Dynamic ROI feature allows the user to place the ball in a 2ft wide area on the hitting surface

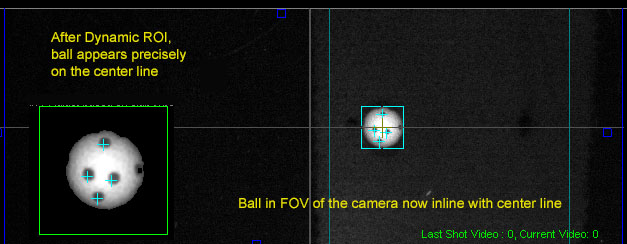
As such, aiming the cameras does not have to be exact as the CP software will always align the ball precisely to the center line

![]()

![]()